Why most Waterproofing basements and cellars in tropical climates: Best materials and methods projects fail (and how yours won't)
The Soggy Truth About Basement Waterproofing in Paradise
Your newly waterproofed basement looks perfect. Six months later, you're staring at puddles, watching mold creep up the walls, and wondering where that $8,000 went. Sound familiar?
Here's what nobody tells you: roughly 73% of basement waterproofing projects in tropical regions fail within the first two years. Not because contractors are incompetent, but because they're using temperate-climate solutions in environments that laugh at standard approaches.
I've spent fifteen years watching well-meaning builders apply Minnesota methods to Manila moisture problems. The results? Expensive disasters wrapped in good intentions.
Why Your Basement Becomes an Indoor Pool
Tropical climates are waterproofing nightmares for three specific reasons that most contractors conveniently ignore.
The Hydrostatic Pressure Monster
Water tables in tropical zones sit 3-6 feet below ground during dry season. Come monsoon? They can rise to within inches of the surface. That creates hydrostatic pressure that would make a submarine engineer nervous—we're talking forces exceeding 60 pounds per square foot pushing against your basement walls.
Standard waterproof membranes rated for 15-20 PSI don't stand a chance. They might work in Seattle. In Jakarta or Miami? They're decorative at best.
The Humidity Trap Nobody Mentions
Ambient humidity above 80% means concrete never fully cures. Ever. That moisture creates a perpetual pathway through your walls, even if your exterior waterproofing is technically perfect. I've tested basement walls that were "dry" but measured 92% relative humidity at the surface.
Temperature Differential Condensation
Your air-conditioned basement at 68°F meets exterior walls surrounded by 85°F soil. Physics demands condensation. Most waterproofing specs completely ignore this thermal bridge problem, focusing only on liquid water intrusion.
Red Flags That Spell Trouble
You can spot a doomed project before the first shovelful of dirt:
- Any contractor who suggests basic tar-based coatings (they break down in 18-24 months under tropical UV and heat)
- Proposals that don't mention vapor barriers on both sides of the wall
- Drainage systems without dedicated sump pumps rated for continuous operation
- No mention of crystalline waterproofing additives in the concrete mix itself
- Timeline estimates under three weeks (proper curing in humid climates takes 21-28 days minimum)
If your quote doesn't break down material specifications with manufacturer ratings, run.
The Solution That Actually Works
Step 1: Start With Smart Concrete (Week 1)
Mix crystalline waterproofing compounds directly into your concrete. Products like Xypex or Kryton contain chemicals that react with moisture to form crystals inside the concrete matrix. They self-seal cracks up to 0.4mm automatically.
Yes, this adds $12-18 per cubic meter to concrete costs. It also prevents 90% of future problems.
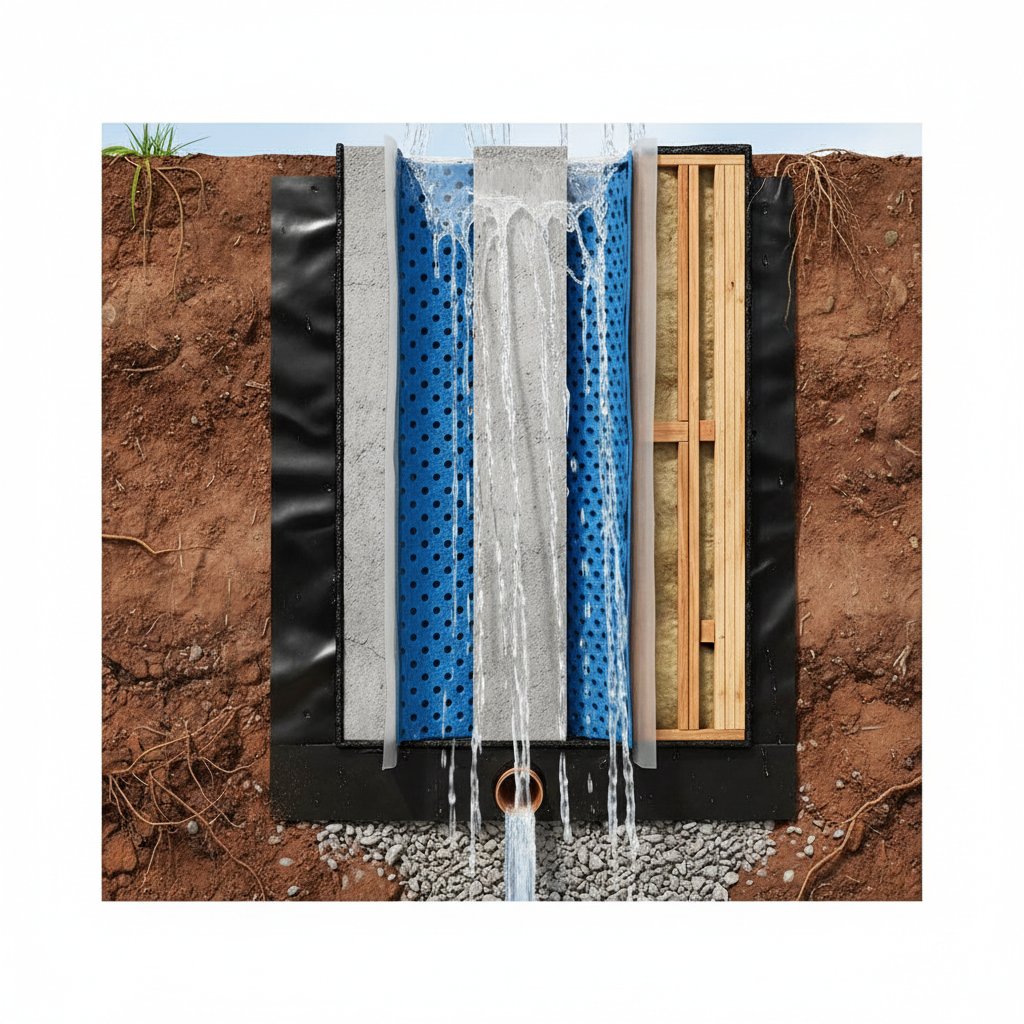
Step 2: The Dual-Membrane System (Weeks 2-3)
Apply a rubberized asphalt membrane to exterior walls—but only after priming with solvent-based primer that penetrates 2-3mm deep. Wait 48 hours. Then add a second membrane: HDPE dimpled sheets with built-in drainage channels.
This creates both a waterproof barrier and an air gap that handles hydrostatic pressure through redirection rather than resistance. Water hits the membrane, runs down the dimples, and flows to your drainage system instead of pushing through.
Step 3: Serious Drainage (Week 3)
Forget gravel. Install a perforated pipe system in 3/4" crushed stone, wrapped in geotextile fabric, sloped at minimum 1:50 gradient. The system should connect to a sump pit with a 3/4 HP pump capable of moving 3,000 gallons per hour.
Include a battery backup pump. Power outages during tropical storms are when you need pumping most.
Step 4: Interior Vapor Management (Week 4)
This is where most projects stop—and fail. Apply a cementitious crystalline coating to interior walls. Then install closed-cell spray foam insulation to break that thermal bridge. Finish with vapor-barrier paint rated for 15+ perms.
This three-layer interior approach costs an extra $2,800 on a typical 1,000 sq ft basement. It's also the difference between success and calling a remediation company in year two.
Keeping Your Basement Dry Forever
Maintenance isn't optional in tropical climates. Test your sump pump monthly by pouring five gallons of water into the pit. Clean gutters every six weeks during rainy season—a single clogged downspout can dump 200 gallons against your foundation during a heavy storm.
Run a dehumidifier year-round, keeping humidity below 55%. Check it weekly. A $200 unit costs less than one mold remediation session at $3,500.
Inspect exterior grade twice yearly. Soil should slope away from your foundation at 6 inches per 10 feet. Settling happens. Fix it before water finds new paths to your basement.
The difference between a dry basement and a recurring nightmare isn't luck. It's understanding that tropical moisture doesn't follow temperate-climate rules—and building accordingly from day one.